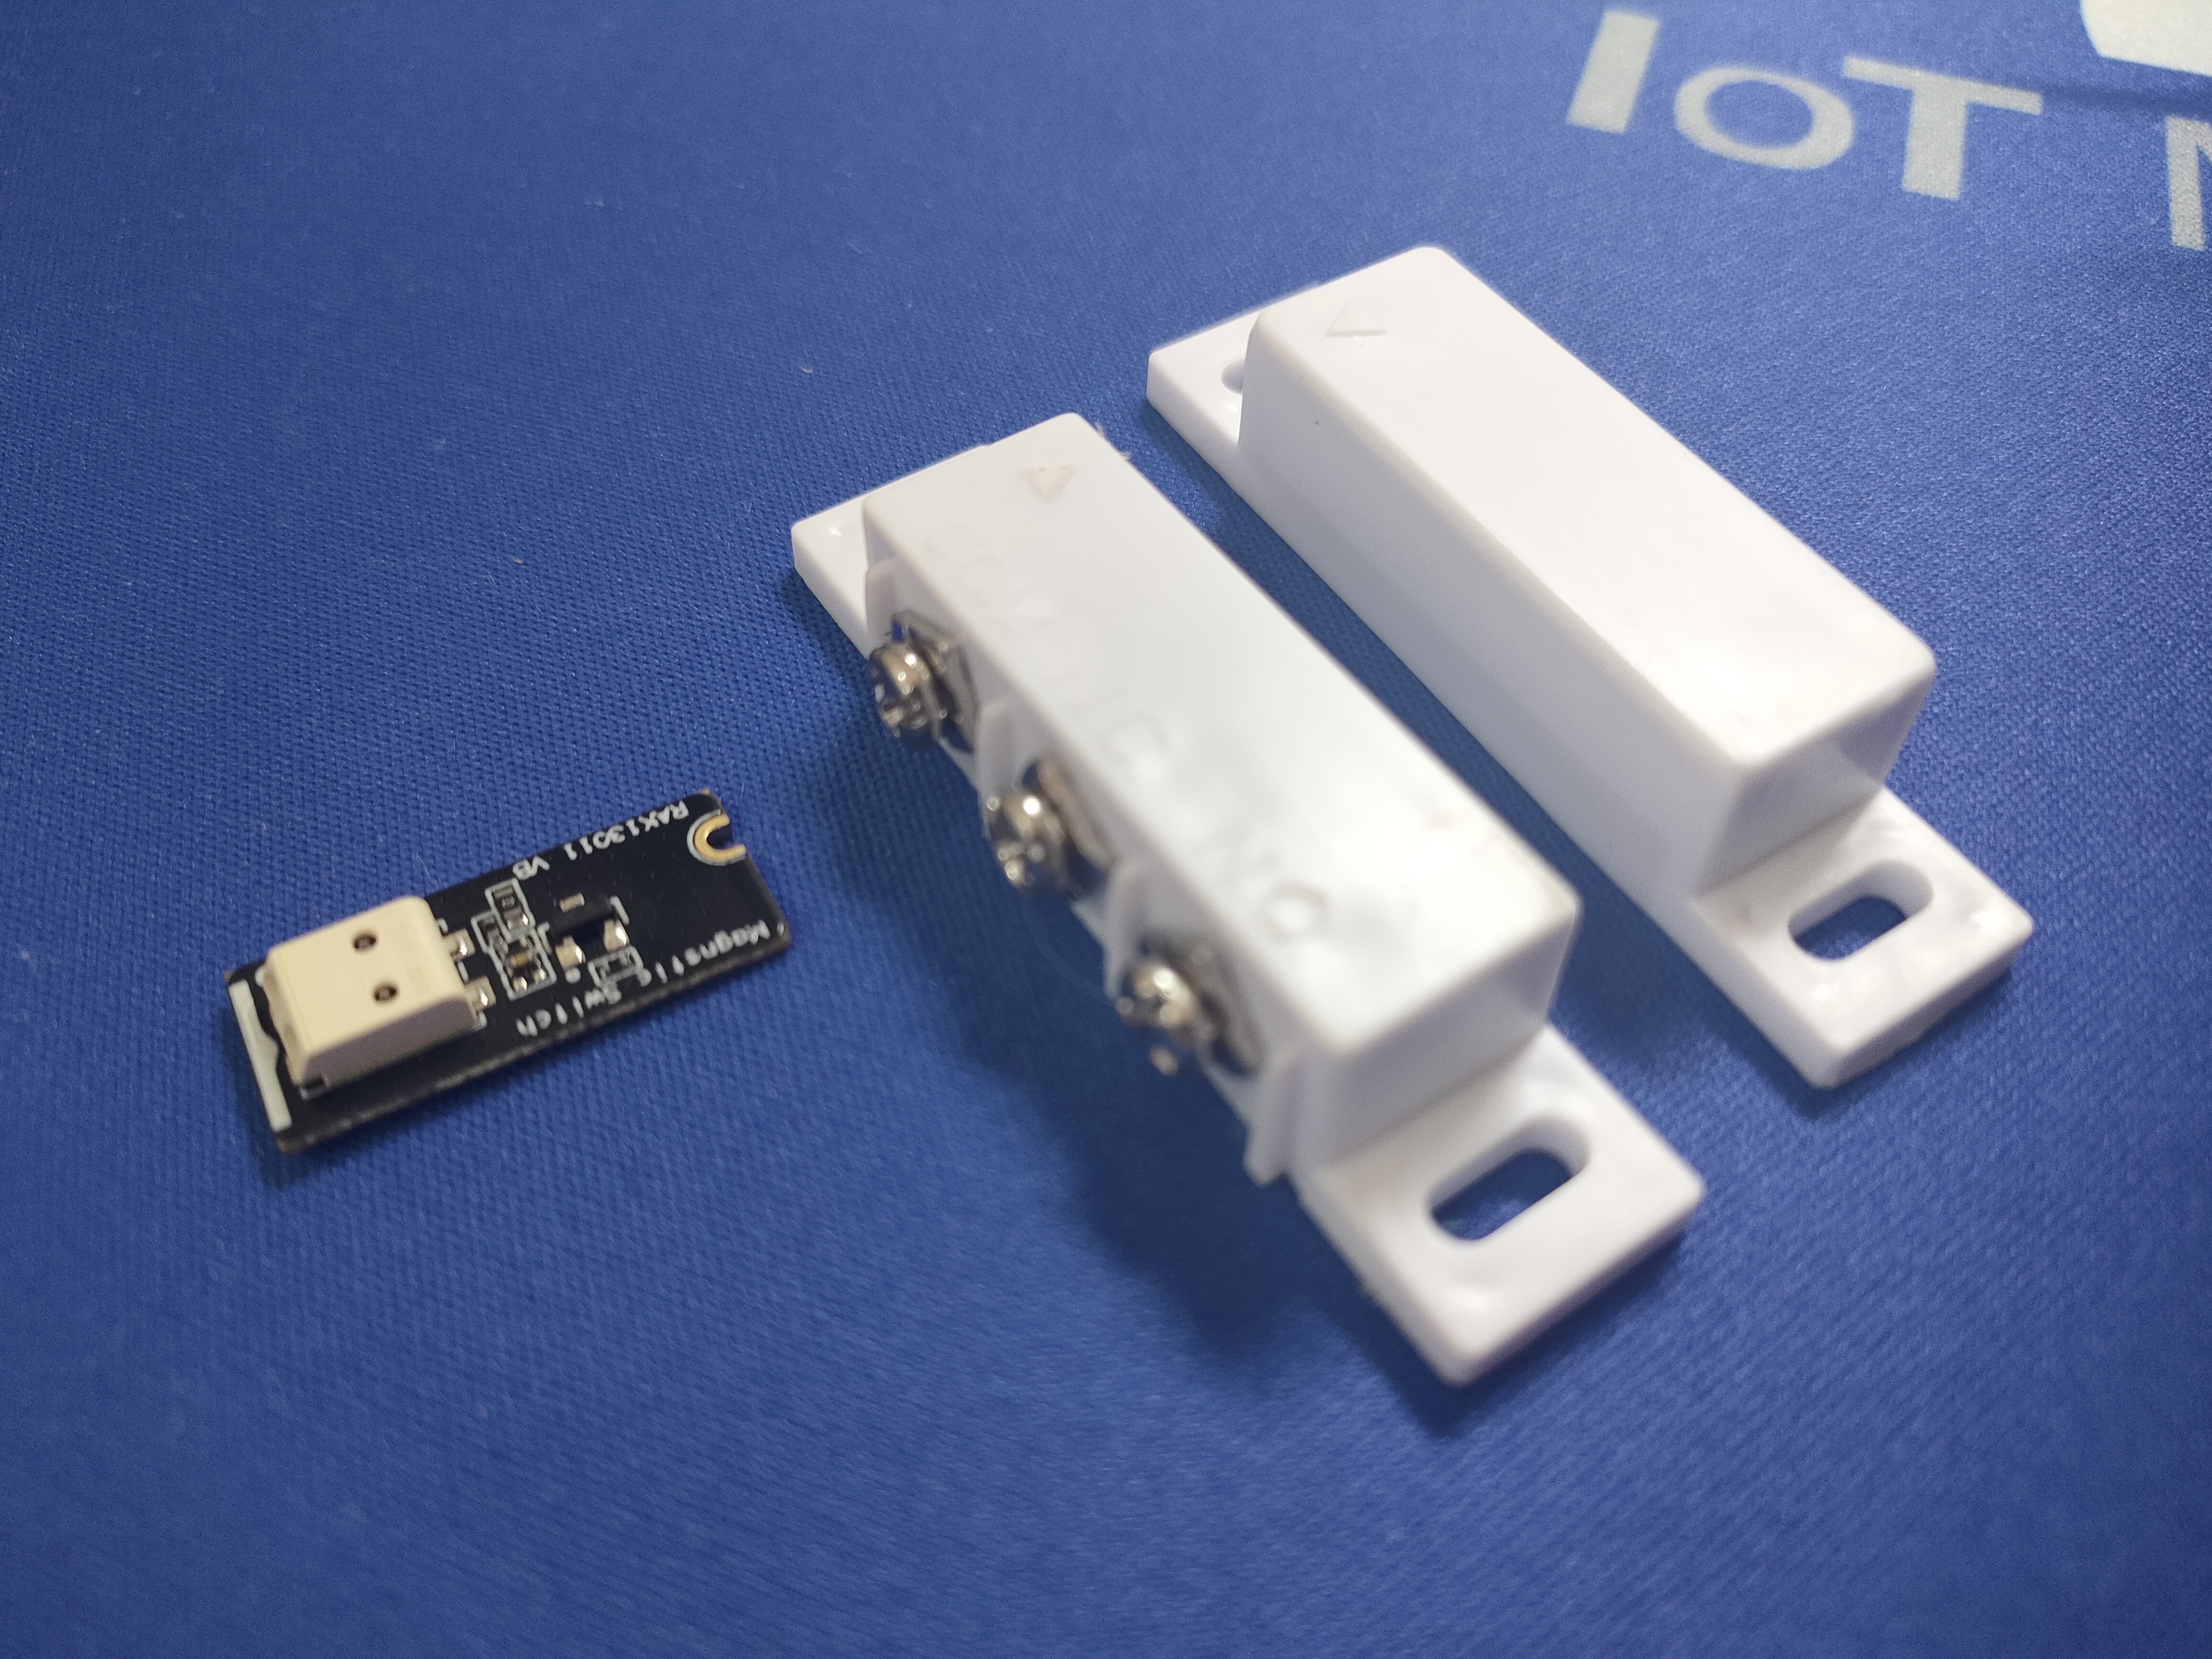
Reed relays are often used for contactless switching in many applications. The reed relay is normally open, but when a magnet is getting close to it, the relay contacts will close.
Here we will use this feature to create door (or window) open/close detector. This can be useful for home alarm systems or in industrial applications where an automatic door in a production line requires to count how often it is opened and closed or to make sure that the door is actually working.
The RAK13011 magnetic switch module includes a WisBlock module, an external reed relay and a magnet to control the reed relay.
The RAK13011 module fits into a sensor slot, but due to its size it occupies two sensor slots. It is recommended to use Slot C of the RAK19003 Base Board or Slot D of the RAK19007 Base Board. Using these slots will not occupy two sensor slots, as they are designed for these longer sensor modules.
All the modules are available at the RAKwireless Store.
The source code of this application is open source and can be downloaded from the Github repos
The application is using LoRaWAN to transmit the status through a gateway to a LoRaWAN server. Integrations connected to the LoRaWAN server can then be used to take actions.
As LoRaWAN is not a fast communication medium, a ring buffer is used to store open and
close events in case they are happening faster than the WisBlock Core module can transmit the events.
The buffer
is designed to keep up to 50 events, but it can be increased if required.
The reed relay contacts do not have any debouncing mechanism. It can easily happen that the bouncing of the relay contacts triggers multiple interrupts. The debouncing is done in the application by checking if the status has changed since the last interrupt.
The application code is available in two versions.
1) The first one is for the open source Arduino BSP and PlatformIO. It works with the WisBlock Core modules RAK4631,
RAK11310 and RAK11200 (with RAK13300 LoRa module).
The application is based on the WisBlock-API-V2. Instead of running endless in the
loop(), it is using timers and events to keep the MCU in idle/sleep mode as much as
possible.
2) The second version is for RUI3 and works with the RAK4631-R and the RAK3372 Core modules.
Due to a GPIO conflict with the RAK3372, The RAK13011 does not work when using Sensor Slot C. With the RAK3372 the RAK13011 must be used in another Sensor Slot.
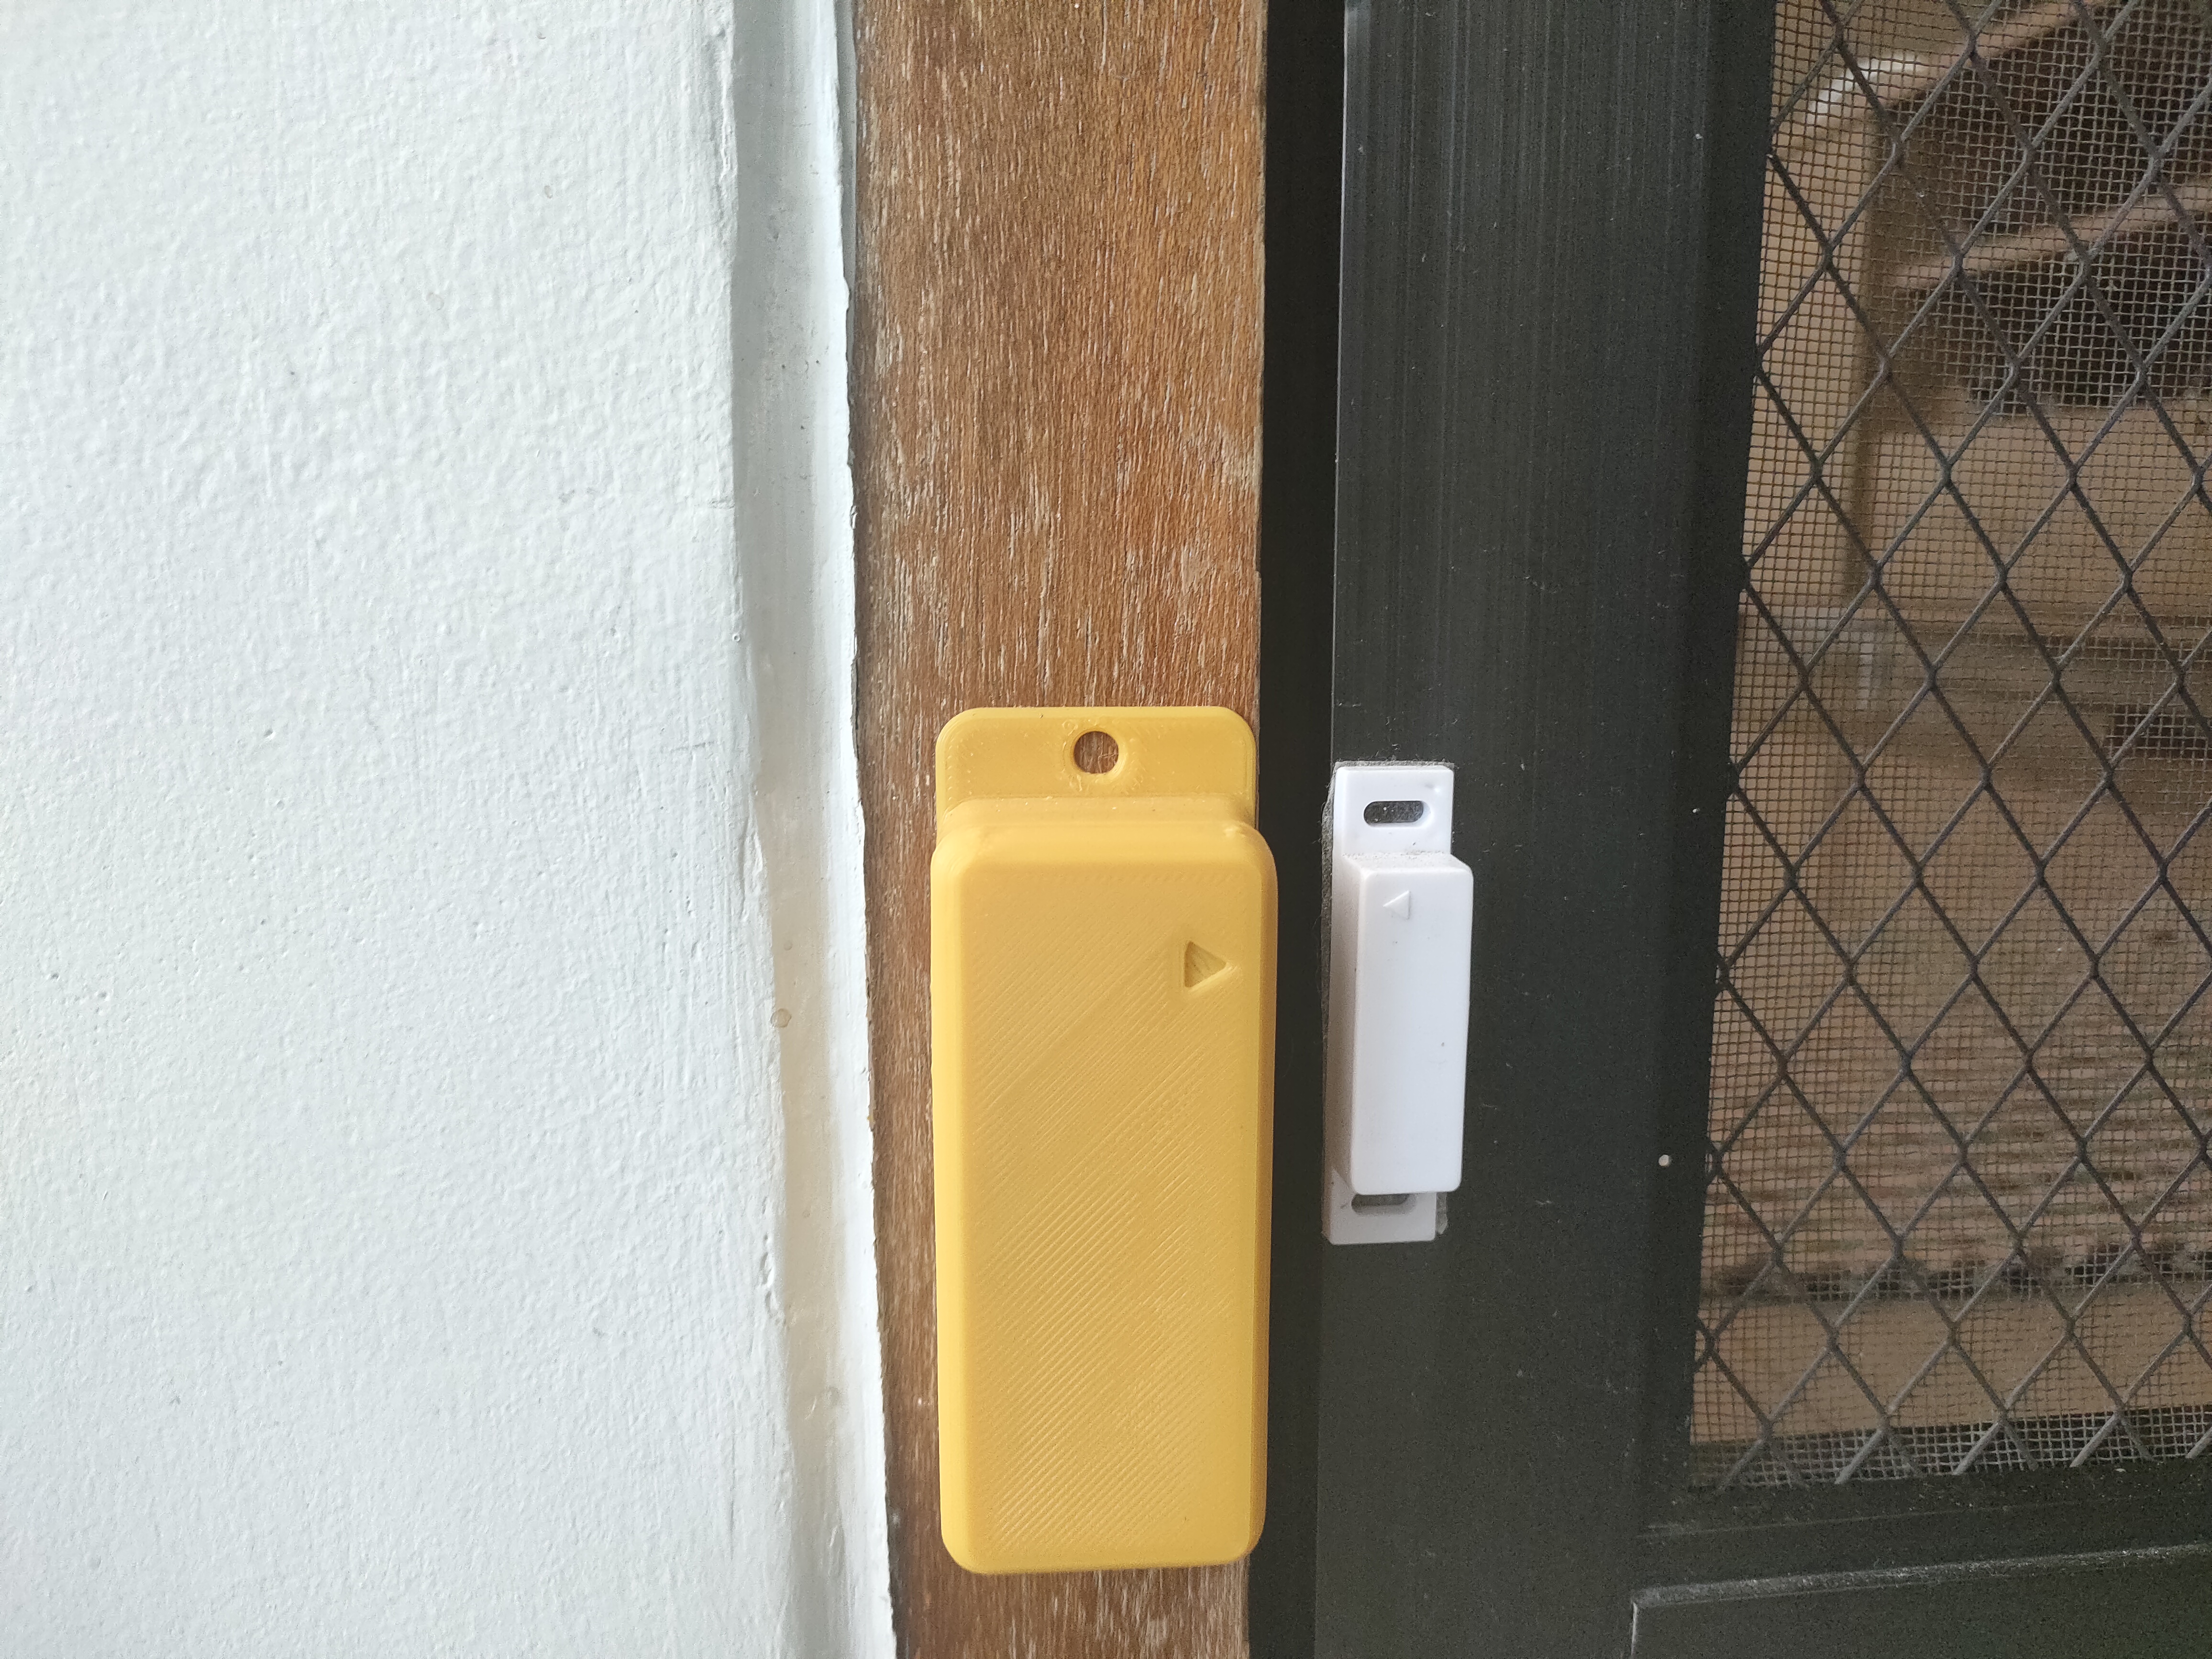
When using as a window or door sensor, there are two options to deply the sensors.
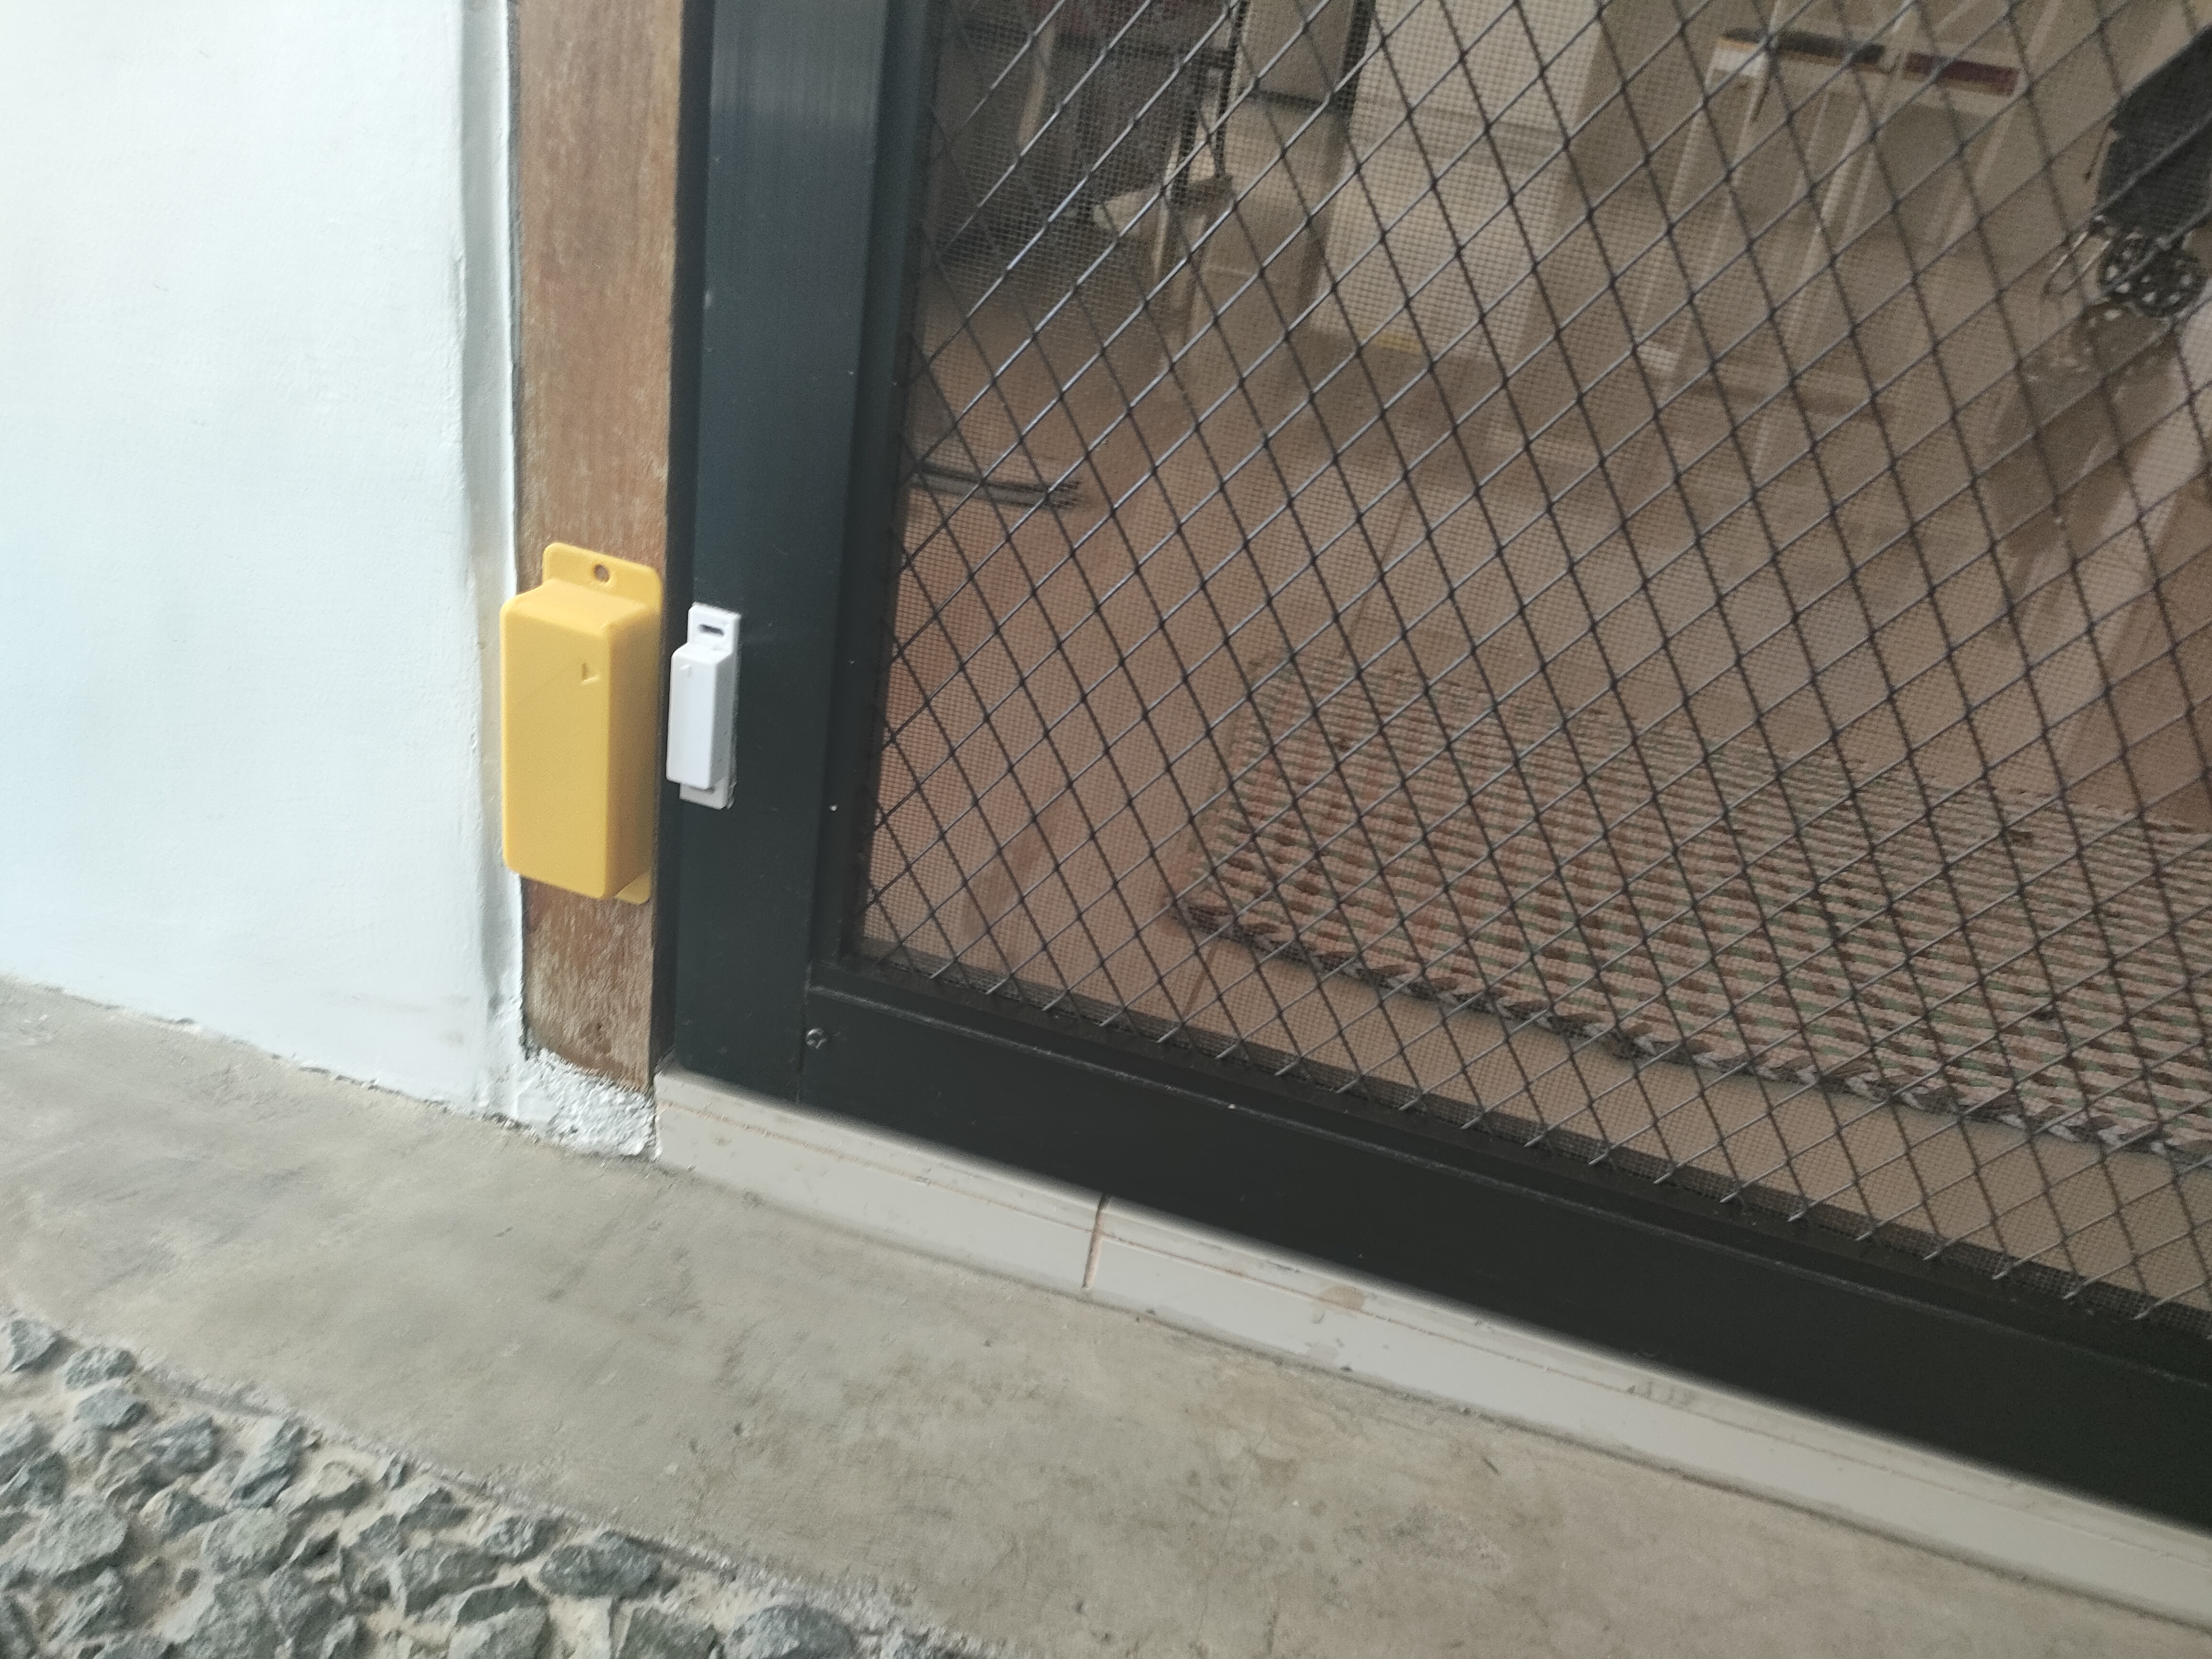
1) Use the encapsulated reed relay and magnet parts and connect the RAK13011 with wires. But this is not a very elegant solution and can look very ugly.
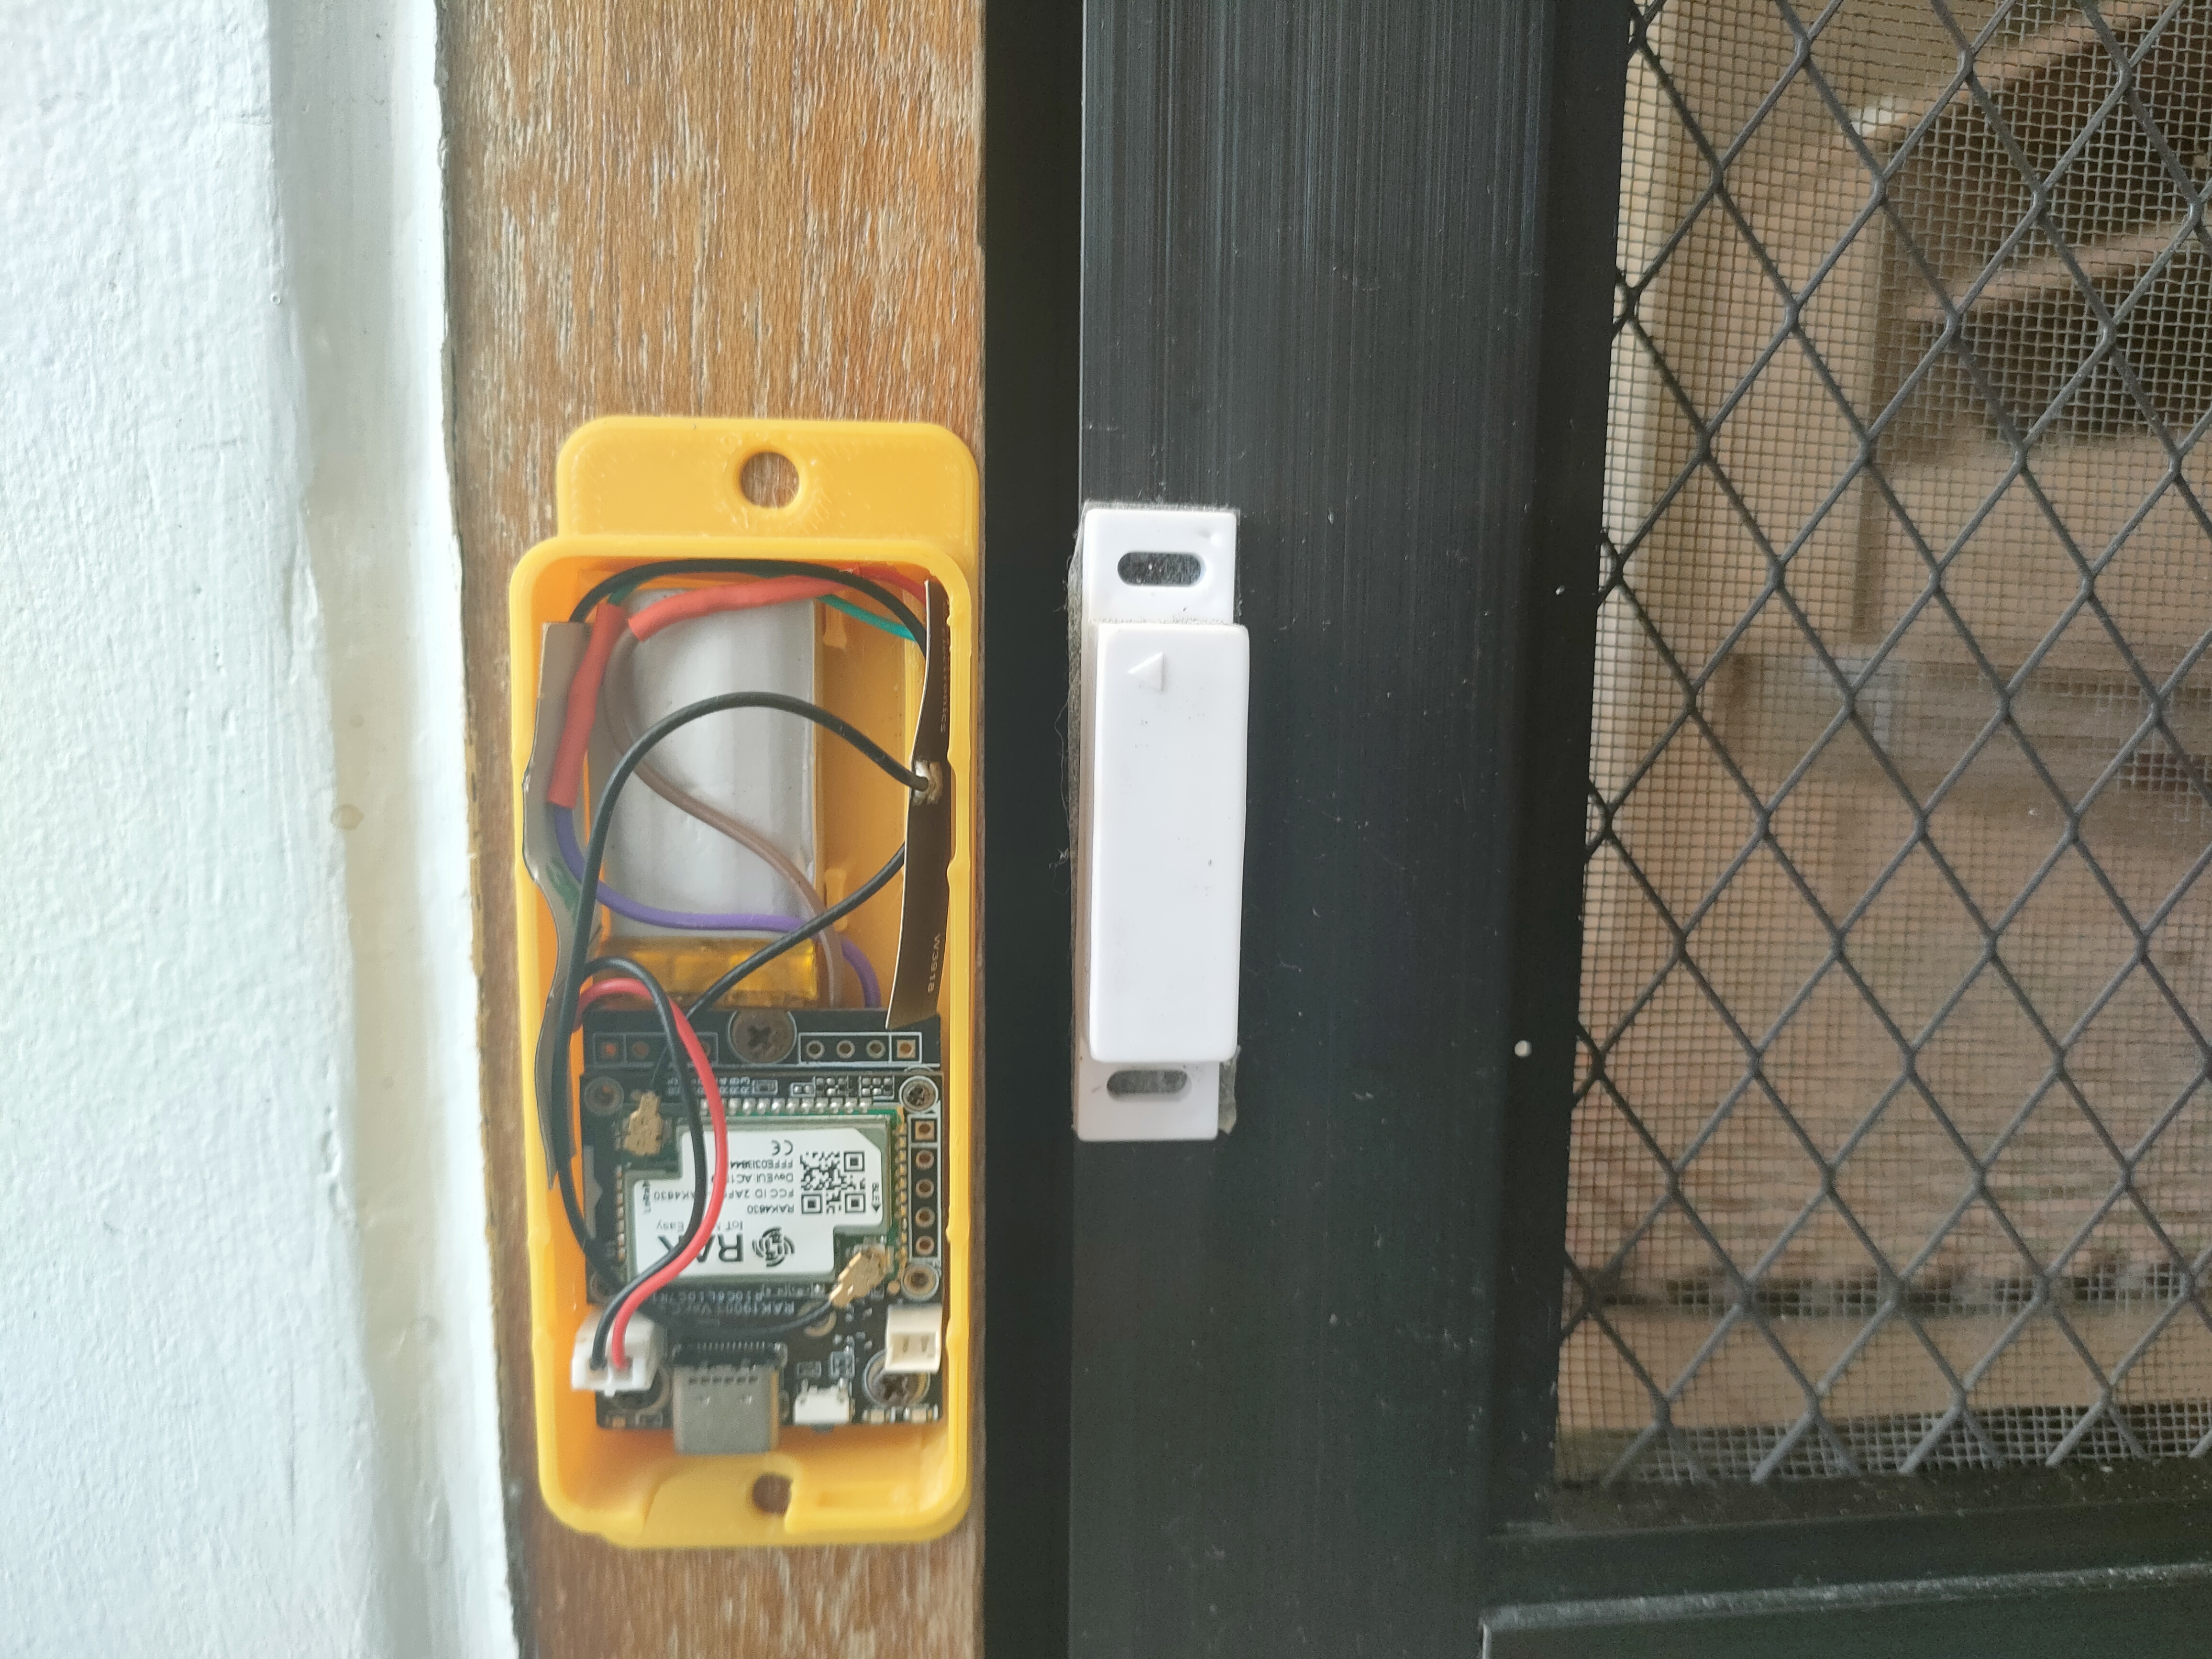
2) Take the reed relay out from the encapsulated part (or just buy a separate reed relay) and put the WisBlock modules, the battery and the reed relay into a small custom enclosure.
For this tutorial I chose the second option:
| 
|
| BSP Version | Module | Function |
|---|---|---|
| Open Source Arduino BSP | RAK4631 | WisBlock Core Module |
| RUI3 | RAK4631-R | WisBlock Core Module |
| RUI3 | RAK3372 | WisBlock Core Module |
| Any | RAK19003 | WisBlock Base Board |
| Any | or RAK19007 (for RAK3372) | WisBlock Base Board |
| Any | RAK13011 | WisBlock Magnetic Switch |
| Any | Optional RAK1901 | WisBlock Temperature and Humidity Sensor |
1. IDE
Open Source Arduino BSP and PlatformIO
RUI3
2. LoRaWAN and BLE Communication
Open Source Arduino BSP and PlatformIO
Both BSP versions
When using PlatformIO, the required libraries are automatically installed. If the RUI3 version is used in the Arduino IDE, all libraries must be installed manually with the Arduino IDE Library Manager.
In both the open source and the RUI3 version, the WisBlock Core module is going into sleep mode after it connected to the LoRaWAN server.
There are two events that are waking up the WisBlock Core module:
Everything else is handled in the background by RUI3 or the WisBlock-API.
Code examples used are from the PlatformIO version of the code.
These is not the complete code, only snippets taken from the sources.
In case a door opening or closing event is detected, the application will receive a wake up signal from the interrupt callback.
void switch_int_handler(void)
	{
	    switch_status = digitalRead(SWITCH_INT);
	    api_wake_loop(SWITCH_CHANGE);
	}
The application will then check the status of the relay to eliminate bouncing effects.
if (switch_status == (uint32_t)digitalRead(SWITCH_INT))
	{
	    MYLOG("SWITCH", "Switch Status confirmed");
	}
	else
	{
	    MYLOG("SWITCH", "Switch bouncing");
	    return;
	}
Next the event will be added to the ring buffer. If there is still a packet sending activity, a timer will be started to delay the next packet sending
// Add event to queue
	MYLOG("APP", "Adding event to queue, pending %ld", uxQueueMessagesWaiting(event_queue));
	xQueueSendToBack(event_queue, &switch_status, 0);

	if (lora_busy)
	{
	    delayed_sending.start();
	    return;
	}
	else
	{
	    g_task_event_type |= STATUS;
	}
In case it is possible to send the packet immediately, the event type is changed and the sending routine is called. First the battery level is measured, then the oldest event status is pulled ring buffer and both values are added to the LoRaWAN packet.
// Reset the packet
	g_solution_data.reset();

	// Get battery level
	float batt_level_f = read_batt();
	g_solution_data.addVoltage(LPP_CHANNEL_BATT, batt_level_f / 1000.0);

	// Add switch status, get the event out of the queue
	uint32_t last_switch_status = 0;
	xQueueReceive(event_queue, &last_switch_status, 0);
	MYLOG("APP", "Pulled event from queue, pending %ld", uxQueueMessagesWaiting(event_queue));

	g_solution_data.addPresence(LPP_CHANNEL_SWITCH, last_switch_status);

	lmh_error_status result = send_lora_packet(g_solution_data.getBuffer(), g_solution_data.getSize());
The packet data is made compatible with the extended Cayenne LPP encoding from ElectronicCats/CayenneLPP.
The content of the packet depends on the modules installed on the WisBlock Base Board:
| Data | Channel No. | Channel ID | Length | Comment | Required Module | Decoded Field Name |
|---|---|---|---|---|---|---|
| Battery value | 1 | 116 | 2 bytes | 0.01 V Unsigned MSB | RAK4631 | voltage_1 |
| Door event | 48 | 102 | 1 bytes | bool | RAK13011 | presence_48 |
- The Channel IDs in cursive are extended format and not supported by standard Cayenne LPP data decoders.
- Example decoders for TTN, Chirpstack, Helium, and Datacake can be found in the Github repo.
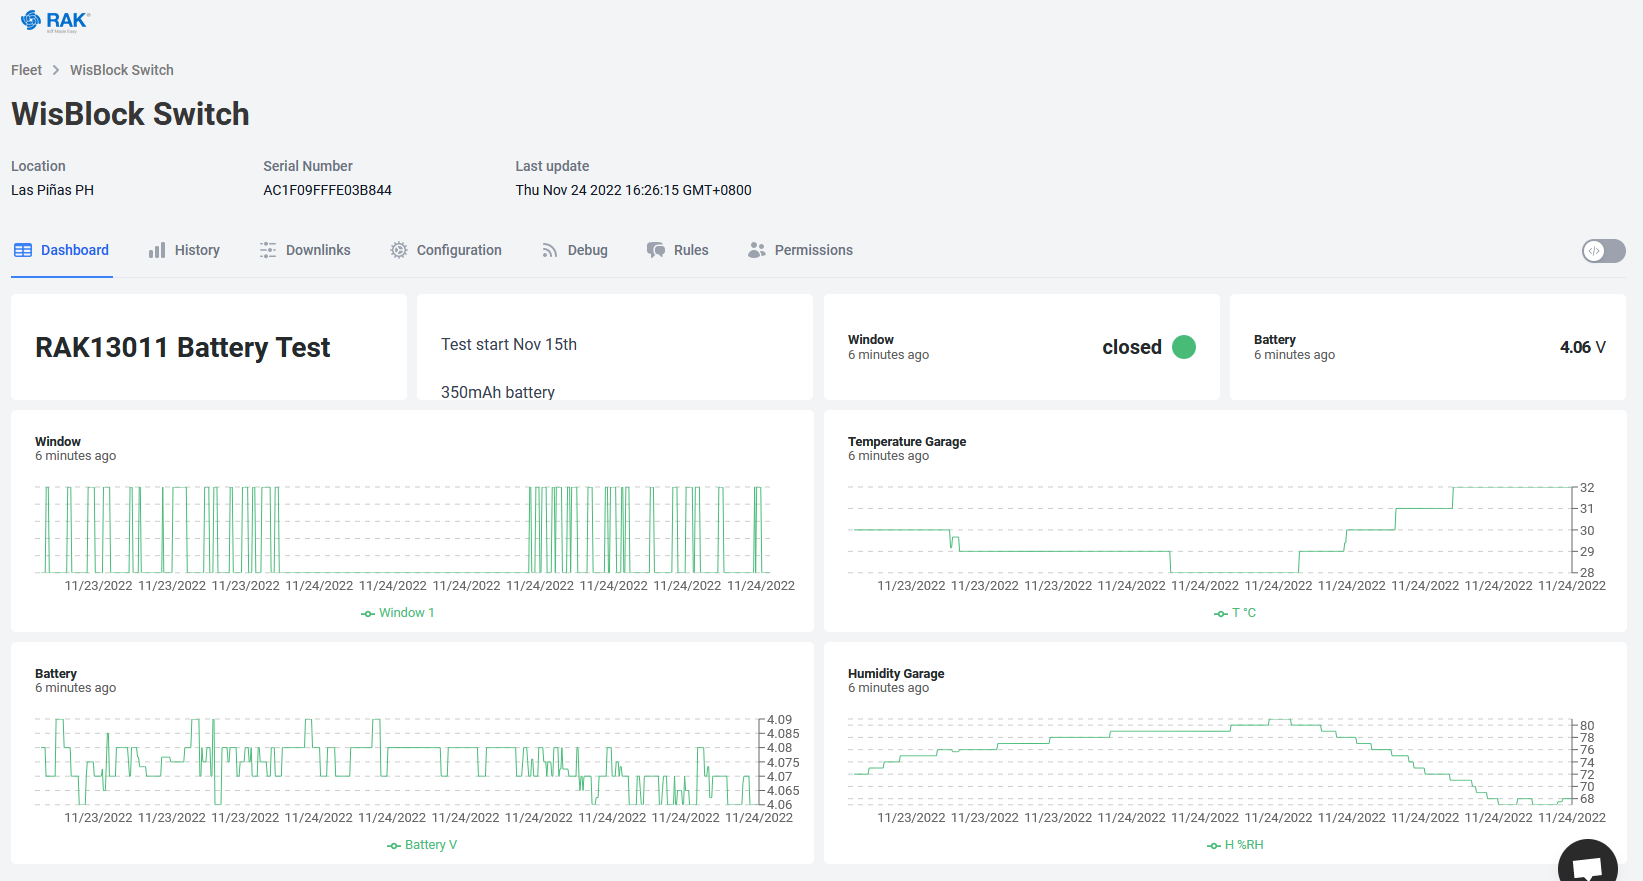
As a simple example to visualize the door events, I created a device in Datacake. Datacake is an easy-to-use Low Code IoT platform. In my Datacake account, I set up the device with the matching payload decoder, visualization, and creation of an email alert.
In the device configuration, the Datacake decoder from the decoders folder is used.
The battery values and the door events are stored in Datacake fields. The door events are called
Window 1 because I started the project as a window opening alarm system.
| Field Name | Identifier | Type |
|---|---|---|
| Battery | VOLTAGE_1 | Float |
| Window 1 | PRESENCE_48 | Boolean |
In the dashboard, you can show the current status of the door/window. In the latest code, I added a temperature and humidity sensor, so these values are shown as well (only when using the open source Arduino BSP).